10 Inspiring Nail Art Ideas and Designs for Beginners to Try Today
Nail art has become a popular trend, captivating beginners and professionals alike with its endless possibilities for creativity and self-expression. Whether you’re looking to enhance your manicure or simply want to have fun with colors and designs, exploring nail art can be an exciting journey. In this article, we will delve into the basics of nail art, providing you with the essential knowledge and inspiration to get started on your nail design adventure.
Nail Art Basics
Understanding nail art is crucial for anyone looking to embark on this colorful journey. Nail art is not just about applying polish; it’s an intricate process that involves creativity, technique, and a keen eye for design. Beginners can find immense inspiration in various styles, from chic French manicures to bold ombre effects. Grasping the fundamentals allows you to experiment with different colors and patterns, ultimately leading to the creation of stunning nail designs that can impress anyone.
Understanding Nail Art
At its core, nail art is a form of self-expression through the decoration of nails. It encompasses a wide range of designs, from simple dots and stripes to elaborate 3D creations. Beginners should explore various techniques, such as using a sponge for gradient effects or a striper brush for intricate line work. Understanding the different elements of nail art—like color theory and design balance—can help you create cohesive and visually appealing nail designs, turning your fingertips into a canvas of creativity.
Essential Tools for Beginners
To get started with nail art, having the right tools is essential. A basic kit should include nail polish in various colors, a base coat, a top coat, and a few brushes, such as a small brush for detailed work and a striper brush for creating fine lines. Additionally, tools like dotting tools or toothpicks can help you create tiny dots and intricate designs. Using high-quality polish and tools not only enhances your creations but also ensures your nail art lasts longer and looks professional.
Preparing Your Nails for Art
Before diving into nail art, proper nail care and preparation are vital. Begin by trimming and shaping your nails to your desired length, ensuring they are clean and free of any old polish. Applying a base coat is crucial, as it protects your nails and provides a smooth surface for your nail designs. Once the base coat is dry, you’re ready to layer on your chosen colors and designs. This preparation sets the stage for stunning nail art and allows you to apply your polish uniformly, enhancing the overall look of your manicure.
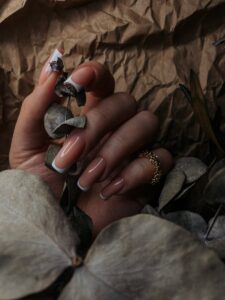
Photo by Anastasia Kisil on Pexels
Popular Nail Art Techniques
Gradient Nail Designs
Gradient nail designs, also known as ombre nails, are a fantastic way for beginners to explore color transitions and create a stunning look. This technique typically involves blending multiple colors seamlessly from one nail tip to the base. To achieve this, you can use a sponge to dab different colors onto your nails, creating a soft gradient effect that looks professional and chic. It’s essential to start with a base coat to protect your nails and ensure that the gradient shows up vibrantly. With practice, you can experiment with various color combinations, allowing your creativity to shine through as you stun onlookers with your unique nail art.
Creating French Tips
French tips are a classic nail design that can elevate any manicure, making it look polished and sophisticated. This technique involves painting the tips of your nails a contrasting color, often white, over a natural or light-colored base. To create perfect French tips, you can use a striper brush or nail stickers for precision. The key is to ensure the polish is still wet when applying the tip color, allowing for seamless blending. As a beginner, practicing the curve of the tips will help you achieve that iconic look. French tips can also be customized with glitter or different colors to complement any outfit, making them a versatile choice for any occasion.
Using Glitter for Sparkle
Incorporating glitter into your nail art designs is an excellent way to add a touch of sparkle and glamour. Whether you choose to apply glitter polish directly or use loose glitter for a more textured look, the options are endless. For beginners, applying a base coat followed by a layer of glitter polish is the easiest method. You can also use a small brush to place loose glitter strategically on your nails for a more intricate design. Glitter can be combined with various nail art styles, from subtle accents to bold full-nail coverage. When done correctly, glitter nail art can create a fun vibe that really makes your nails stand out in a crowd.
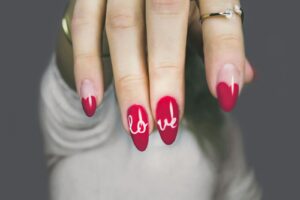
Photo by DESIGNECOLOGIST on Unsplash
Beginner-Friendly Nail Art Ideas
Simple Dot Designs
Simple dot designs are among the most accessible nail art ideas for beginners, allowing for creativity without overwhelming complexity. To start, you’ll need a dotting tool or even a toothpick to create tiny dots on your nails. You can apply a base coat to protect your nails and let it dry before choosing multiple colors to create a playful polka dot pattern. For a chic look, consider using contrasting colors—like white polish on a vibrant hue or vice versa. The key is to vary the size and spacing of the dots to add dimension to your design. Once you’ve achieved your desired look, seal it with a top coat to ensure your nail art lasts, creating a fun vibe that will surely stun onlookers.
Sleek White Stripes
Sleek white stripes can elevate your nail design instantly, offering a sophisticated touch to your manicure. This technique is ideal for beginners looking to create a polished appearance. Start by applying a base coat followed by a solid color of your choice, allowing it to dry completely. Once dry, use a striper brush to apply white polish in straight lines across your nails. You can create horizontal or vertical stripes, or even an angled design for added flair. To enhance the look, consider using different widths for your stripes or incorporating glitter along the edges. Finishing with a top coat will help to maintain the design and provide a professional finish, making your nails look salon-perfect.
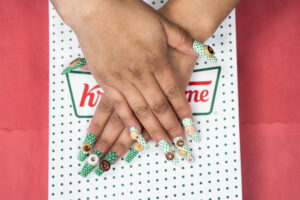
Geometric Patterns
Geometric patterns are an exciting way to explore nail art, adding a modern twist to your manicure. For beginners, these designs can be created using nail tape or stickers to ensure precision. Start by applying a base coat and allowing it to dry before painting your nails with a bold color. Once dry, use the tape to create shapes like triangles, squares, or lines, and fill them in with different colors. Combining various hues can create a stunning contrast that draws attention. After completing your geometric masterpiece, don’t forget to apply a top coat to seal the design and add shine, ensuring your nail art remains intact and looks great for days to come.
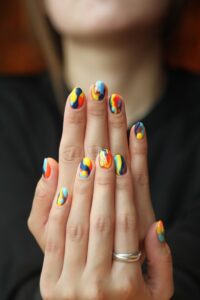
Photo by Budka Damdinsuren on Unsplash
Inspiration from Trends
Current Nail Design Trends
Staying updated with current nail design trends is essential for any nail artist seeking inspiration. The world of nail art is ever-evolving, showcasing innovative techniques and creative designs that reflect personal style. Popular trends include minimalist designs featuring sleek white stripes or chic French manicures that enhance the natural beauty of the nails. Additionally, vibrant gradient effects are making waves, allowing for seamless transitions between multiple colors. As you explore these trends, consider how they can inspire your nail art, pushing the boundaries of creativity while ensuring your designs remain stylish and on-trend.
Accent Nails for a Pop of Color
Accent nails are a fantastic way to add a pop of color and creativity to your manicure. By painting one or two nails in a bold hue or intricate design while keeping the rest of the nails in a more neutral color, you create a stunning focal point. This technique allows for the incorporation of different colors and patterns, such as glitter or geometric shapes, without overwhelming the overall look. Whether you opt for a jewel-toned accent nail or a playful polka dot design, accent nails can elevate your nail art and provide a fun vibe that complements your outfit.
Seasonal Nail Art Inspirations
Seasonal nail art inspirations offer endless opportunities to reflect the beauty of each time of year through your manicure. For example, during spring, florals and pastel colors are popular, allowing for creative designs that evoke a sense of freshness. In contrast, autumn brings rich hues and textured designs, such as ombre effects in warm shades. Winter can inspire nail art using glitter and jewel tones, while summer might lead to bright, bold colors and playful patterns. By embracing seasonal themes, you can transform your nails into a canvas that tells a story, making your nail art truly unique and expressive.
The Future of Nail Technicians
Advanced Techniques for the Future
Exploring Advanced Nail Art
As you gain confidence in your nail art skills, exploring advanced techniques can take your designs to the next level. Techniques such as 3D embellishments, intricate swirls, and detailed brushwork allow for the creation of stunning nail designs that can wow onlookers. Using tools like a striper brush and detailing tips, you can apply small designs with precision, creating a professional look reminiscent of salon-quality art. Experimenting with gel polishes also offers the opportunity for longer-lasting designs and a glossy finish. By pushing your creative boundaries, you can discover new styles that redefine your nail art experience.
Tips for Mastering Nail Art with a Brush
Mastering nail art with a brush requires practice and patience, but the results can be incredibly rewarding. Start by selecting the right brush; a fine striper brush is excellent for creating delicate lines and intricate patterns. It’s essential to work with wet polish to ensure smooth application and prevent the paint from dragging. Additionally, practicing on a practice wheel or fake nails can help you refine your technique before moving to your own nails. Experimenting with different brush strokes and sizes can lead to unique designs, allowing you to develop your signature nail art style over time.
Innovative Designs for Experienced Beginners
For experienced beginners looking to innovate their nail art, consider combining various techniques to create unique designs. For instance, mixing gradient effects with geometric patterns can produce striking results, while incorporating metallics or holographic polishes adds a modern twist. Additionally, using nail stickers or stamping can introduce intricate designs without the need for expert brushwork. Don’t shy away from experimenting with textures, such as matte versus glossy finishes, to add depth to your nail art. By continually challenging yourself with new styles and techniques, you can ensure that your nail designs remain fresh and exciting, stunning everyone who catches a glimpse of your manicure.
10 Inspiring Nail Art Ideas and Designs for Beginners to Try Today
What are some easy nail art ideas for beginners?
If you’re just starting with nail art, consider trying simple designs like polka dots or stripes. These can be created using a basic nail polish and a small brush or even a toothpick. For a fun and playful vibe, use different colors to create tiny dots across your nail. Remember to apply a base coat first to protect your natural nail and ensure a smooth application.
How can I create a chic nail design at home?
Creating a chic nail design at home is easier than you think! Start with a clean and manicured nail surface. After applying a base coat, choose a sleek color as your base. You can then use a striper brush to add a white stripe or swirl for an elegant touch. Finish off with a top coat to seal your look and add that stunning shine!
What tools do I need for nail art?
To get started with nail art, you don’t need a lot of fancy tools! A basic set should include a variety of brushes (like a small brush for details and a striper brush), dotting tools, and a selection of nail polish in various colors. Optional tools include sponges for gradient effects and stickers for easy application. With these tools, you’re ready to explore your creativity!
Can I use gel polish for beginner nail art?
Absolutely! Gel polish can be a fantastic option for beginners, as it tends to last longer than traditional nail polish. Just keep in mind that you’ll need a UV or LED lamp to cure the gel. Start with simple designs and work your way up as you become more comfortable. Don’t forget to apply a top coat to seal your designs and add a glossy finish. This will not only enhance the look of your artwork but also protect it from chipping and wear.
When using gel polish, consider investing in a few basic tools such as nail brushes, dotting tools, and striping tape. These can help you create more intricate designs without overwhelming yourself. Practice basic techniques like ombre effects, simple lines, or dots before attempting more complex patterns.
Additionally, be sure to prepare your nails properly by cleaning, buffing, and applying a base coat. This will ensure better adhesion and a smoother application.
Remember, nail art is all about having fun and expressing your creativity, so don’t be afraid to experiment and make mistakes. With a little patience and practice, you’ll soon be creating beautiful designs that will impress both yourself and others!