8 Advanced Hair Coloring Techniques Every Stylist Should Know
Understanding advanced hair coloring techniques is essential for any stylist who wants to expand their skill set and serve diverse clients. These techniques go beyond basic single-process color applications. They allow you to create dimension, correct previous color mistakes, and achieve looks that keep clients coming back. Whether you’re a recent graduate or an experienced professional, mastering these advanced hair coloring techniques will set you apart in the competitive beauty industry.

Photo by Maksim Chernishev on Unsplash
Why Advanced Hair Coloring Techniques Matter for Your Career
The hair coloring industry evolves constantly. Clients arrive with inspiration photos from social media and expect precise results. Basic color application skills will only take you so far in your career. Advanced hair coloring techniques enable you to handle complex requests with confidence.
Stylists who master these techniques often command higher prices for their services. They build stronger client relationships through consistent results. Advanced color work requires understanding hair structure, color theory, and proper product application. Each technique serves a specific purpose and solves particular hair challenges.
Learning advanced hair coloring techniques also protects your clients’ hair health. Poor color application can cause severe damage. Proper technique preserves hair integrity while achieving beautiful results. This knowledge separates amateur work from professional excellence.
Balayage: Hand-Painted Dimensional Color
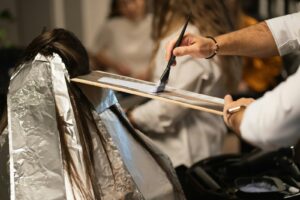
Balayage represents one of the most popular advanced hair coloring techniques in salons today. This French method involves hand-painting color onto hair sections. The result creates natural-looking dimension that grows out beautifully.
Unlike traditional foil highlights, balayage allows for customized placement. You paint color where it naturally catches light. This technique works on all hair lengths and textures. The freehand application requires a strong understanding of color theory and sectioning patterns.
Start by sectioning hair into manageable areas. Apply lightener or color using a brush or paddle. Paint in sweeping motions from mid-shaft to ends. The key is blending seamlessly without harsh lines. Many stylists prefer this technique because it requires less frequent touch-ups than traditional highlights.
Practice makes perfect with balayage. The hand-painting motion feels awkward initially. Over time, you develop muscle memory and artistic intuition. Study how light naturally hits different hair textures. This knowledge guides your color placement for the most flattering results.
Balayage Application Tips
Consider the client’s natural hair movement when placing color. Curly hair requires different placement than straight hair. Face-framing pieces typically receive lighter application. This brightens the face and creates dimension around the hairline.
Processing time varies based on desired lightness and starting level. Check your work frequently during processing. Balayage can process unevenly if not monitored carefully. The ends often lighten faster than mid-lengths.

Photo by Ionela Mat on Unsplash
Foilyage: Combining Two Popular Methods
Foilyage merges traditional foiling with balayage painting. This hybrid technique produces brighter results than balayage alone. The foils provide heat and lift color more dramatically. Yet you maintain the natural placement of hand-painted application.
Apply color using balayage placement principles. Then wrap selected sections in foils. The foil creates a greenhouse effect that intensifies processing. This advanced hair coloring technique works wonderfully for clients wanting noticeable lightness without harsh lines.
Foilyage requires understanding both techniques thoroughly. You need to know which sections benefit from foiling versus air processing. Generally, you foil sections requiring maximum lift. Leave softer, blended areas to process openly.
This technique offers versatility for various hair types. Fine hair benefits from the controlled lift foils provide. Thick, coarse hair responds well to the additional heat. The combination gives you more control over the final result than balayage alone.
Color Melting: Seamless Blending Technique
Color melting creates seamless transitions between multiple hair colors. This advanced technique involves applying several shades that blend into each other. The result looks fluid and dimensional without visible lines.
Start with your lightest shade at the roots or ends, depending on the desired look. Apply progressively darker or lighter shades in adjacent sections. Blend where colors meet using your fingers or a brush. This creates the “melted” appearance that gives the technique its name.
Color melting works particularly well after highlighting. It softens harsh lines left by foils or balayage. Many stylists use this as a finishing technique. The process requires understanding how colors interact and blend naturally.
Choose colors within the same tonal family for best results. Warm tones blend beautifully with other warm tones. Mixing warm and cool without intention can create muddy results. Plan your color formula carefully before starting application.
Mastering Color Theory for Melting
Understanding the color wheel is crucial for successful color melting. Adjacent colors on the wheel blend smoothly. Opposite colors create contrast or neutralize each other. This knowledge guides your formula choices.
Consider the client’s natural undertones when selecting shades. Warm undertones look best with golden, copper, or auburn tones. Cool undertones suit ashy, violet, or beige shades. Matching color temperature to natural undertones creates harmonious results.
Root Shadowing: Adding Natural Depth
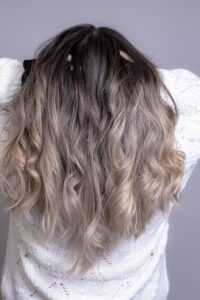
Root shadowing adds darker color at the roots while maintaining lighter ends. This advanced hair coloring technique creates intentional regrowth that looks planned rather than neglected. It extends time between color appointments and adds dimension.
Apply a shade close to the client’s natural color at the root area. Blend it down one to three inches, depending on hair length. The shadow creates depth and makes lighter colors look more natural. This technique works exceptionally well after heavy highlighting.
Root shadowing requires precise blending skills. The transition from dark to light must look seamless. Use a color brush to feather the shadow into lighter sections. Some stylists prefer applying with gloved hands for softer blending.
This technique solves the harsh grow-out problem many highlighted clients face. Instead of a visible line, they have an intentional gradient. The darker roots make hair appear thicker and fuller. The dimension creates movement and interest throughout the hair.

Photo by Lera Kogan on Unsplash
Hair Painting: Artistic Color Placement
Hair painting involves applying color with artistic intention and precision. Unlike traditional sectioning methods, this technique allows complete creative freedom. You paint color where you envision it, creating unique looks for each client.
This advanced approach requires strong visual skills. Study your client’s face shape, hair texture, and natural movement. Determine where color would be most flattering. Paint lighter shades around the face and on top layers for brightness.
Use various application tools for hair painting. Brushes, sponges, and even fingers create different effects. Experiment with tools to discover which produces your desired result. The application method affects how color blends and processes.
Hair painting excels for creating fashion colors or creative looks. You have complete control over color placement. This makes it ideal for artistic expression and unique client requests. The technique works on any hair length or texture.
Developing Your Artistic Eye
Successful hair painting requires developing your artistic vision. Study how colors interact in nature. Notice how light creates highlights naturally. This observation informs your color placement decisions.
Practice on mannequins before attempting complex hair painting on clients. Mannequins allow you to experiment without pressure. Try different placement patterns and color combinations. Document your work to track your artistic growth.
Color Correction: Fixing Previous Mistakes
Color correction ranks among the most challenging advanced hair coloring techniques. It involves fixing unwanted color results from previous services. This might include removing brassiness, correcting uneven color, or removing dark box dye.
Assess the hair carefully before starting correction work. Determine the current level and tone. Identify any damage that might affect the correction process. Create a plan that achieves the desired result while maintaining hair integrity.
Color correction often requires multiple sessions. Trying to fix everything in one appointment can cause severe damage. Be honest with clients about realistic timelines. Explain why multiple visits protect their hair health.
Understanding color theory is absolutely essential for correction work. You must know how to neutralize unwanted tones. Use a color wheel to identify complementary colors. These cancel each other out, eliminating unwanted hues.
Some corrections require lifting dark color before depositing new color. This involves using color removers or lighteners. Always perform strand tests before proceeding with full correction. This prevents unexpected results and additional damage.
Babylights: Delicate Natural Highlights
Babylights create extremely fine, delicate highlights throughout the hair. These micro-highlights mimic the natural sun-kissed look children often have. The technique requires patience and precision but delivers stunning, natural results.
Section hair into very fine pieces, much smaller than traditional highlights. Apply lightener or color to these tiny sections. The result creates subtle dimension that catches light beautifully. Babylights work wonderfully for clients wanting natural-looking brightness.
This advanced hair coloring technique takes significant time. The fine sectioning requires patience and steady hands. However, the results justify the extra effort. Clients receive highlights that blend seamlessly with their natural hair.
Babylights suit all hair colors and types. Brunettes gain sun-kissed warmth without obvious highlights. Blondes achieve added dimension and brightness. Even grey hair benefits from strategic babylight placement.
Babylight Application Methods
Most stylists use foiling for babylight application. The foils separate tiny sections and provide controlled processing. Some prefer balayage application for even softer results. Choose your method based on desired brightness and your comfort level.
Place babylights throughout the hair, not just on the surface. Interior placement creates dimension when hair moves. Focus on areas that naturally catch light. The top layers, around the face, and along partings typically receive more babylights.

Photo by Ionela Mat on Unsplash
Teasing Technique: Soft Rooty Highlights
The teasing technique creates soft, rooty highlights with natural gradient. Back-comb small sections before applying color. The teasing prevents color from reaching the root, creating automatic shadowing.
Place your foil or color board under a small section. Tease the section several times, pushing hair back toward the root. Apply lightener or color to the teased section. The backcombing creates varying saturation from root to ends.
This method produces results similar to balayage but with more control. The teasing ensures color doesn’t reach the root directly. You get natural-looking dimension without the need for root shadowing afterward.
The teasing technique works particularly well on clients with fine hair. It adds textural dimension along with color dimension. The varied saturation creates movement and fullness. This makes hair appear thicker and more voluminous.
Practice this technique to develop the right teasing pressure. Too little teasing allows color to reach roots. Too much teasing can cause tangling or damage. Find the balance that creates ideal color placement.
Mastering Advanced Hair Coloring Techniques in Your Career

Photo by cottonbro studio on Pexels
Developing expertise in advanced hair coloring techniques requires ongoing education and practice. These skills don’t develop overnight. Dedicate yourself to continuous learning and experimentation. Attend workshops, watch educational videos, and practice regularly.
Build a portfolio showcasing your advanced color work. Before and after photos demonstrate your skills to potential clients. Document each technique you master. This helps you track your progress and identify areas needing improvement.
Consider working with a mentor experienced in advanced color techniques. Learning from someone skilled accelerates your development. They can spot mistakes you might miss and offer valuable feedback. Many successful colorists credit mentorship for their expertise.
Stay current with industry trends and evolving techniques. Follow respected colorists on social media for inspiration. Read professional beauty publications regularly. Attend hair shows and educational events when possible. The industry evolves quickly, and ongoing education keeps your skills relevant.
Remember that advanced hair coloring techniques require understanding hair health fundamentals. Never sacrifice hair integrity for a color result. Damaged hair won’t hold color well and reflects poorly on your skills. Build your reputation on both beautiful results and healthy hair.
These eight advanced hair coloring techniques provide a strong foundation for career growth. Master each one through dedicated practice and study. Your clients will notice the difference in your work quality. Your confidence will grow as your technical skills improve. The investment in learning these methods pays dividends throughout your entire career as a professional stylist.

