10 Facial Treatment Techniques Every Esthetician Must Master
Learning proper facial treatment techniques is the cornerstone of every successful esthetic practice. These techniques separate amateur work from professional excellence. Whether you’re starting your esthetics training or refining your skills, mastering these fundamental facial treatment techniques will serve you throughout your entire career. Each technique requires knowledge, practice, and attention to detail. Your clients trust you with their skin health. The facial treatment techniques you use directly impact their results and satisfaction.
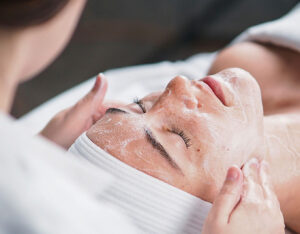
Spa Facial Mask
Why Facial Treatment Techniques Form the Foundation of Your Esthetic Career
Professional facial treatment techniques require years of training and practice. Clients visit spas expecting results they cannot achieve at home. Your technical skills determine whether they return for future appointments. Strong technique builds trust. Clients who see consistent improvements become loyal advocates for your services.
The beauty industry evolves constantly. New products and equipment enter the market regularly. However, foundational facial treatment techniques remain timeless. Master these basics first. Advanced treatments become easier once you understand proper fundamentals.
Improper technique can damage skin. Aggressive extraction causes scarring. Over-exfoliation leads to irritation and sensitivity. Poor massage technique fails to produce results. Professional training teaches you to work safely and effectively. This protects both you and your clients.
Comprehensive Skin Analysis and Client Consultation
Every successful facial treatment starts with thorough skin analysis. This first technique determines everything that follows. You cannot select appropriate products or treatments without understanding your client’s skin condition. Skin analysis requires both visual inspection and tactile examination.
Use a magnifying lamp during analysis. Position it close enough to see details clearly but not so close that it causes discomfort. Many estheticians use a brightly lit magnifier mounted on an adjustable arm. Cover the client’s eyes with cotton pads during this step. The bright light can feel strenuous without protection.
Reading Skin Conditions Accurately
Start your visual examination on one side of the face. Work systematically around to ensure you examine every area. Look for signs of dehydration, sun damage, and congestion. Note areas of uneven texture or discoloration. Check for active acne, blackheads, or whiteheads. Observe pore size throughout different facial zones.
Touch the skin gently during analysis. Healthy skin feels smooth and bounces back when pressed. Dehydrated skin feels tight and may show fine lines. Oily skin appears shiny and feels slick to touch. Combination skin shows different characteristics in the T-zone versus cheeks. Take detailed notes during your analysis. These notes guide your treatment plan.
Understanding Client Goals and Concerns
Ask open-ended questions about your client’s skincare concerns. Listen carefully to their answers. Some clients struggle with acne breakouts. Others worry about aging signs or discoloration. Your client’s goals matter as much as your professional assessment.
Discuss their current home care routine. Many skin issues stem from incorrect product use or aggressive at-home treatments. Identify any allergies or sensitivities before selecting products. Some clients cannot use certain ingredients due to medical conditions or medications.
Creating Customized Treatment Plans
Document everything you observe and hear during consultation. This information becomes your treatment roadmap. Choose products and techniques based on both skin condition and client expectations. Explain your plan before beginning treatment. Walk through each step you will perform and why.
Set realistic expectations during consultation. One facial cannot reverse years of sun damage. Acne-prone skin requires consistent treatments over time. Honesty builds trust even when clients want immediate miracles. Recommend an appropriate treatment frequency based on their skin needs.
Double Cleansing for Deep Purification
Cleansing represents your first hands-on facial treatment technique. Many clients arrive wearing makeup or sunscreen. Others have accumulated oil and environmental pollutants throughout their day. Surface cleaning alone cannot prepare skin for treatment. Double cleansing ensures thorough purification.
Begin with a gentle makeup remover or cleansing oil. Apply it to dry skin using soft, circular motions. This first cleanse breaks down makeup, sunscreen, and oil-based debris. Use damp cotton pads or sponges to remove the first cleanser. You should see makeup and dirt transfer onto the cotton.
Makeup and Surface Impurity Removal
Focus extra attention on areas where makeup accumulates heavily. The eye area requires gentle handling due to delicate skin. Remove mascara carefully to avoid pulling lashes. Check the hairline and jawline where foundation often lingers.
Some clients wear waterproof makeup that resists standard cleansers. Keep specialized makeup removers on hand for stubborn products. Never scrub or rub aggressively to remove makeup. This damages skin and creates unnecessary irritation. Patience produces better results than force.

Photo by Dominique Rivas on Unsplash
Deep Cleansing for Different Skin Types
Your second cleanse targets the skin itself rather than surface debris. Select a cleanser appropriate for your client’s skin type. Oily skin benefits from gel or foam cleansers. Dry skin needs cream or milk cleansers that preserve natural oils.
Apply the second cleanser to dampened skin. Use upward and outward strokes across the face. This massage-like application feels luxurious while distributing product evenly. Pay attention to the T-zone where oil production concentrates. Clean around the nose carefully where pores often become congested.
Rinse thoroughly with lukewarm water. Hot water strips protective oils. Cold water may shock sensitive skin. Test water temperature on your inner wrist before applying to the client’s face. Remove all cleanser residue completely. Product left on skin interferes with subsequent treatment steps.
Exfoliation Methods for Healthy Cell Turnover
Exfoliation removes dead skin cells that accumulate on the surface. This facial treatment technique reveals fresh, healthy skin underneath. Proper exfoliation improves product absorption. Active ingredients penetrate deeper when dead cell buildup is removed. Exfoliation also stimulates cell renewal and improves skin texture.
Two main exfoliation categories exist: mechanical and chemical. Mechanical methods use physical particles or tools to buff away dead cells. Chemical exfoliants use acids or enzymes to dissolve the bonds between dead cells. Both approaches work effectively when applied correctly.
Mechanical Exfoliation Techniques
Mechanical exfoliants contain small particles that manually slough dead skin. Common exfoliating particles include jojoba beads, rice powder, or synthetic microbeads. Some mechanical exfoliants use ground nuts or seeds. However, these can have sharp edges that cause micro-tears.
Apply mechanical exfoliant to damp skin using gentle circular motions. Never scrub vigorously. Excessive pressure damages healthy skin tissue. Work in small sections across the face. Avoid sensitive areas like active breakouts or thin skin near the eyes.
Microdermabrasion represents advanced mechanical exfoliation. This technique uses a specialized device that sprays fine crystals onto skin or uses a diamond-tipped wand. The machine simultaneously exfoliates and vacuums away dead cells. Microdermabrasion provides deeper exfoliation than manual methods.
Chemical Exfoliation Applications
Chemical exfoliants include alpha hydroxy acids (AHAs), beta hydroxy acids (BHAs), and enzymes. AHAs like glycolic and lactic acid work on the skin surface. They improve tone and texture while addressing fine lines. BHAs like salicylic acid penetrate pores. This makes them excellent for oily, acne-prone skin.
Enzyme exfoliants use fruit-derived enzymes to digest dead skin proteins. Pumpkin and papaya enzymes work gently without the potential irritation of acids. Enzymes suit sensitive skin types particularly well.
Apply chemical exfoliants according to manufacturer instructions. Most require specific application times and techniques. Layer acid products carefully if using multiple types. Always neutralize acids properly after the recommended processing time. Leaving acids on too long causes burns and damage.
Professional Steaming for Pore Preparation
Steaming softens skin and opens pores. This facial treatment technique prepares skin for extraction and enhances product penetration. The warm moisture loosens hardened sebum plugs. Steam also provides a relaxing, spa-like experience that clients enjoy.
Position your facial steamer at the appropriate distance from the client’s face. Too close causes discomfort or burns. Too far provides insufficient benefit. Most professionals position steamers 12-18 inches away. Adjust based on steam intensity and client sensitivity.
Benefits of Facial Steaming
Steam increases blood circulation to facial tissues. Enhanced circulation delivers oxygen and nutrients to skin cells. This promotes healing and gives skin a healthy glow. The warmth also encourages perspiration. Sweating helps eliminate toxins through pores.
Steaming hydrates the outer layers of skin temporarily. This extra moisture makes skin more pliable and easier to work with. Products applied after steaming absorb more readily. The heat also relaxes facial muscles. Many clients find steaming incredibly soothing.
Proper Steam Duration and Temperature
Most facial treatments include 10-15 minutes of steaming. Duration varies based on skin type and treatment goals. Oily, congested skin tolerates longer steam sessions. Dry, sensitive skin requires shorter exposure. Never leave steam running for more than 20 minutes.
Monitor your client during steaming. Ask if the temperature feels comfortable. Some clients find steam overwhelming initially. You can adjust distance or add breaks if needed. Watch for excessive redness or discomfort. Stop steaming immediately if the client reports burning sensations.

Photo by Dominique Rivas on Unsplash
Add beneficial ingredients to steam water if your equipment allows. Chamomile soothes sensitive skin. Peppermint refreshes and invigorates. Essential oils provide aromatherapy benefits along with steam therapy. Always dilute essential oils properly to avoid irritation.
Safe and Effective Extraction Techniques
Extraction removes comedones – the technical term for clogged pores, blackheads, and whiteheads. This facial treatment technique requires proper training and careful execution. Improper extraction causes scarring, broken capillaries, and skin damage. Many estheticians consider extraction the most challenging technique to master.
Only extract comedones that can be removed safely. Not every blemish should be extracted. Deep, cystic acne requires medical treatment rather than extraction. Attempting to extract deep lesions causes trauma and worsens inflammation. Focus on surface-level congestion that responds to gentle pressure.
Tools and Sanitization Protocols
Professional estheticians use specialized extraction tools. The comedone extractor features a small loop on one or both ends. This loop applies even pressure around the clogged pore. Some extractors have different sized loops for various comedone types.
Sanitize all extraction tools before and after every use. Proper sanitization prevents bacterial transfer between clients. Many estheticians use an autoclave to sterilize metal tools. At minimum, tools should be cleaned with hospital-grade disinfectant. Replace disposable lancets between clients.
Wear gloves during all extraction work. Gloves protect both you and your client from bacterial transfer. Change gloves if they tear or become contaminated. Some estheticians prefer using cotton-wrapped fingers instead of tools. This method requires extremely clean hands and fresh cotton for each extraction.
Recognizing Extractable Comedones
Examine skin carefully under magnification before attempting extraction. Blackheads appear as dark spots in pore openings. The dark color comes from oxidized sebum, not dirt. Whiteheads look like small, white bumps beneath the skin surface. Both types often extract readily when skin is properly prepared.
Apply gentle, even pressure around the comedone using your tool or wrapped fingers. The contents should release easily with minimal pressure. If nothing happens after gentle attempts, stop. Forcing extraction tears skin tissue and can cause permanent scarring. You can try again after additional steam or during a future session.
Clean extracted pores immediately after removal. Use a cotton pad dampened with toner or antiseptic solution. This removes residual sebum and reduces bacterial presence. Apply light pressure to any areas that bled during extraction. Minor bleeding sometimes occurs with stubborn comedones.
Facial Massage for Circulation and Relaxation
Facial massage represents one of the most therapeutic facial treatment techniques. Proper massage increases blood circulation to facial tissues. This enhanced circulation delivers nutrients and oxygen while removing waste products. Massage also provides deep relaxation that clients find extremely valuable.
Learn classic facial massage patterns before experimenting with advanced techniques. Traditional massage moves follow the direction of facial muscles. Upward and outward strokes create a lifting effect. Downward motions work against natural muscle direction and should be avoided.
Classic Massage Techniques
Begin massage at the neck and work upward. Use your fingertips to apply light to medium pressure. Never press so hard that you cause discomfort. Massage should feel pleasant and relaxing. Press firmly enough to engage muscles without causing pain.
Circle around the jawline using small, rotating motions. This area holds significant tension in many clients. Move along the cheekbones toward the temples. The temples serve as natural ending points for many massage sequences. Gentle pressure here feels particularly soothing.
Glide across the forehead using horizontal strokes from center to sides. Massage between the eyebrows where stress tension concentrates. Work carefully around the eye area using ring fingers only. Ring fingers naturally apply lighter pressure than other fingers.
Lymphatic Drainage Applications
Lymphatic drainage massage uses light, rhythmic movements to stimulate lymph flow. The lymphatic system removes waste and excess fluid from tissues. Gentle brushing motions encourage lymph movement toward lymph nodes. These nodes cluster near the ears, jaw, and collarbones.
Lymphatic drainage reduces puffiness and fluid retention. Many clients notice less under-eye swelling after this technique. The massage also helps remove toxins from facial tissues. This can improve skin clarity and reduce congestion.
Use very light pressure for lymphatic drainage. Heavy pressure compresses lymph vessels and defeats the purpose. Your touch should feel like soft brushing rather than deep massage. Follow specific pathways toward lymph node locations. Proper training teaches you these drainage routes.
Mask Selection and Application
Face masks deliver concentrated ingredients to address specific skin concerns. This facial treatment technique provides intensive treatment while allowing you time to perform hand or arm massage. Masks come in many formulations including clay, cream, gel, and sheet varieties.
Select masks based on your skin analysis findings. Clay masks absorb excess oil and impurities. They work wonderfully for oily, congested skin types. Cream masks provide deep hydration for dry skin. Gel masks cool and soothe irritated tissue. Sheet masks deliver serums in a convenient, mess-free format.
Matching Masks to Skin Concerns
Acne-prone skin benefits from masks containing salicylic acid, sulfur, or tea tree oil. These ingredients fight bacteria and reduce inflammation. Clay formulas also help draw out impurities from clogged pores. Avoid heavy oils that might worsen breakouts.
Aging skin responds well to masks rich in antioxidants and peptides. Look for ingredients like vitamin C, retinol, and hyaluronic acid. These components support collagen production and hydration. Firming masks with algae or seaweed provide temporary tightening effects.
Sensitive skin requires gentle, calming ingredients. Chamomile, aloe, and oatmeal soothe irritation. Avoid masks with fragrances, essential oils, or harsh acids. Test products on a small area before applying to the entire face if sensitivity is severe.

Photo by cottonbro studio on Pexels
Proper Application and Removal
Apply masks evenly across the face using clean hands or a mask brush. Brushes provide smoother application and keep hands clean. Work from the center of the face outward. Avoid the immediate eye area and lips unless the product specifically states it’s safe for these zones.
Most masks require 10-20 minutes of processing time. Set a timer to ensure accurate timing. Too little time produces minimal results. Excessive processing time can irritate skin or cause over-drying. Check manufacturer instructions for recommended duration.
Remove masks according to their formulation. Rinse clay and cream masks with lukewarm water using soft circular motions. Peel-off masks require careful removal starting at edges.Sheet masks lift off in one piece. Ensure all product residue is removed completely. Pat skin dry gently with a clean towel.
Advanced Equipment and Technology
Modern esthetic practices incorporate various technological tools. These devices enhance traditional facial treatment techniques. Proper equipment training ensures safe, effective use. Many advanced treatments require specialized certification beyond basic esthetic licensing.
Microdermabrasion for Exfoliation
Microdermabrasion machines provide professional-grade exfoliation. Crystal microdermabrasion sprays fine crystals onto skin while simultaneously vacuuming them away. Diamond-tip microdermabrasion uses a textured wand for similar results without crystals. Both methods remove dead surface cells effectively.
This technique improves skin texture and tone. It reduces the appearance of fine lines, acne scars, and hyperpigmentation. Microdermabrasion stimulates collagen production through controlled exfoliation. Most clients need multiple treatments spaced several weeks apart for optimal results.
Adjust suction strength and treatment intensity based on skin sensitivity. Start conservatively and increase intensity gradually. Aggressive treatment causes redness and irritation. Work in systematic patterns to ensure even coverage. Avoid treating active acne or broken skin.
LED Light Therapy Applications
LED (Light Emitting Diode) therapy uses specific light wavelengths to address various skin concerns. Different colored lights produce different effects. Red light stimulates collagen production and reduces inflammation. Blue light kills acne-causing bacteria. Yellow light improves lymphatic flow and reduces redness.
Position LED panels at the recommended distance from the client’s face. Most treatments last 15-20 minutes. The light feels warm but not hot. Clients can relax completely during LED therapy. Protective eye covering is sometimes required depending on light intensity.
LED therapy produces cumulative results over multiple sessions. One treatment provides minimal visible change. Consistent treatments show progressive improvement. This modality pairs well with other facial treatment techniques. Many estheticians use LED after applying serums to enhance absorption.
High-Frequency for Disinfection
High-frequency machines generate a mild electrical current through a glass electrode. This current creates ozone when exposed to air. Ozone has antiseptic properties that kill surface bacteria. High-frequency treatment helps prevent breakouts and speeds healing.
Use high-frequency on clean, dry skin. The glass electrode touches skin directly during treatment. A slight buzzing sound and mild tingling sensation are normal. Some clients find the sensation unusual but not painful. Treat acne-prone areas for 5-10 minutes per session.
This technique works particularly well after extractions. The antibacterial effect prevents post-extraction breakouts. High-frequency also constricts pores temporarily. This gives skin a smoother, more refined appearance immediately after treatment.
Serum Application and Product Layering
Serums contain concentrated active ingredients in lightweight formulas. These products penetrate deeply due to their small molecular size. Applying serums represents a crucial facial treatment technique. Proper application ensures ingredients reach their target depth.
Choose serums based on your treatment goals and skin analysis. Hydrating serums contain hyaluronic acid or glycerin. Anti-aging serums feature retinol, peptides, or growth factors. Brightening serums use vitamin C or niacinamide. You can layer multiple serums if they address different concerns.
Apply serums to clean, slightly damp skin. Dampness enhances absorption of water-based products. Use your fingertips to pat serums gently into skin. Avoid rubbing vigorously. Pat using light pressure until the product absorbs. Wait a moment between different serums to allow proper absorption.
Layer products from thinnest to thickest consistency. Water-based serums go first. Oil-based serums apply last. This layering sequence prevents heavier products from blocking lighter ones. Give each layer time to absorb before applying the next.
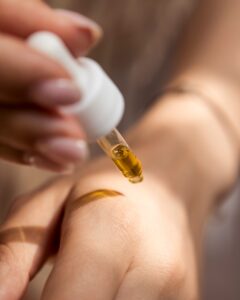
Photo by Enecta Cannabis extracts on Unsplash
Final Moisturization and Sun Protection
Moisturizer seals in all previous treatment products. This final facial treatment technique protects the skin barrier. Moisturizer prevents water loss from surface layers. Proper hydration maintains skin health and appearance between facial appointments.
Select moisturizers appropriate for each skin type. Oily skin needs lightweight, oil-free formulas. Look for gel moisturizers or lotions labeled “non-comedogenic.” These products hydrate without causing congestion. Dry skin requires richer creams with occlusives like shea butter or ceramides.
Apply moisturizer using gentle upward and outward motions. Use enough product to cover the face comfortably without excess. Too little leaves areas unprotected. Too much sits on the surface without absorbing. Extend moisturizer down the neck. Many clients forget neck care in their home routines.
Educate clients about daily sun protection. UV damage causes premature aging, discoloration, and increases skin cancer risk. Recommend broad-spectrum SPF 30 or higher for daily use. Explain that sun protection preserves the results of facial treatments. Unprotected sun exposure undoes the improvements you create.
Continuing Education and Skill Development
Mastering facial treatment techniques requires ongoing practice and learning. The esthetics industry evolves continuously. New technologies and methods emerge regularly. Successful estheticians commit to lifelong learning.
Attend workshops and training sessions whenever possible. Many product manufacturers offer free education about their lines. Industry conferences provide networking opportunities alongside technical education. Online courses let you learn at your own pace. State licensing boards often require continuing education for license renewal.
Practice new techniques on willing friends or family members. This builds confidence before trying techniques on paying clients. Take before and after photos to track your progress. Document what works and what needs improvement. Learn from every facial you perform.
Ask experienced estheticians for mentorship or advice. Most professionals remember learning themselves and willingly share knowledge. Join professional organizations that provide resources and support. Subscribe to industry publications to stay current with trends and research.
Building Your Facial Treatment Expertise
Professional facial treatment techniques form the foundation of your esthetic career. Each technique serves a specific purpose in creating healthy, beautiful skin. Master these fundamentals through careful study and consistent practice. Your technical skill directly impacts client satisfaction and business success.
Start with basics before advancing to complex treatments. Understand why each technique works. Learn proper timing and sequencing. Develop the muscle memory that comes only through repetition. Pay attention to client feedback and visible results.
Remember that every client brings unique needs and challenges. Customize your approach based on thorough skin analysis. Stay current with industry developments through continuing education. Combine traditional techniques with modern technology thoughtfully. Above all, prioritize client safety and comfort in every treatment you perform.
The facial treatment techniques you master today will serve you throughout your career. They represent the core skills that distinguish professional estheticians from casual practitioners. Invest time in perfecting these techniques. Your clients will notice the difference in their skin and their overall spa experience.