Learning About Gel Nails: How to Apply Gel Polish at Home
Gel nails have transformed the world of manicure, offering a long-lasting and durable option for nail enthusiasts. In this guide, we will explore how to apply gel polish at home, ensuring you achieve beautifully polished nails with a professional finish. Understanding the fundamentals of gel nail polish and the step-by-step process will enable you to create stunning gel nails that last longer than traditional nail polish.
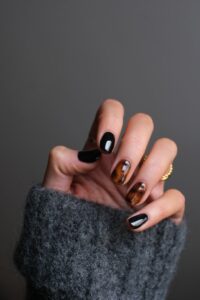
Photo by Bryony Elena on Unsplash
Understanding Gel Nail Polish
Gel nail polish is a unique blend of traditional nail polish and gel, designed to provide a more durable and glossy finish. It is formulated to be cured under a UV or LED light, which helps the gel polish adhere to the nail plate and harden, creating a robust coating. This process enhances the longevity of the manicure, making it resistant to chipping and wear. Whether you are a novice or experienced in nail art, understanding gel nail polish is key to achieving flawless results.
What is Gel Nail Polish?
Gel nail polish is a type of nail polish that requires curing under a UV or LED lamp. Unlike regular nail polish, which dries through evaporation, gel polish undergoes a chemical reaction that hardens the product, resulting in a shiny and resilient finish. This allows for a longer-lasting manicure, as gel nail polish can stay intact for weeks without chipping. Additionally, the application of gel nail polish involves using a gel base coat, followed by coats of gel color, and finished off with a top coat to seal the look.
Benefits of Using Gel Polish
There are numerous benefits to using gel polish for your manicure. One of the primary advantages is the durability; gel nails can last up to three weeks without chipping, making them ideal for those with a busy lifestyle. Another benefit is the glossy finish that gel polish provides, which enhances the appearance of your nails and perfects your manicure. Additionally, gel nail polish is less likely to smudge during the drying process, as the curing method allows for immediate hardening, giving you confidence in your polished look.
Differences Between Gel and Regular Nail Polish
The differences between gel and regular nail polish are significant. While traditional nail polish dries through air exposure and can chip easily, gel polish requires a curing process to set, resulting in a more durable finish. Furthermore, gel manicure applications involve a step-by-step guide that includes using a gel base coat, multiple layers of gel color, and a gel top coat to ensure longevity. Regular nail polish, in contrast, may require more frequent touch-ups, making gel nail polish a more efficient choice for long-lasting beauty.
Preparing to Apply Gel Polish
Before embarking on the journey of applying gel polish, it is crucial to gather the right tools for an effective and enjoyable process. Essential tools include a high-quality UV or LED lamp for curing the gel, a nail file to shape the nails, a buffer to smooth the surface of your nails, and a cuticle pusher to prepare the nail bed. Additionally, having a gel base coat, gel color, and a gel top coat readily available will streamline your application process, ensuring your gel nails at home look professional.
Tools You Need for Gel Nail Application
To successfully apply gel nail polish, you will need specific tools that enhance the application experience. Start with a nail file to create the desired shape of your natural nails, followed by a buffer to refine the nail surface for better polish adherence. A gel base coat is vital, as it provides a foundation that helps the gel color adhere to the nail plate. You’ll also need a gel top coat to seal your manicure and extend its durability, ensuring your gel manicure lasts longer.
Preparing Your Nails for Gel Application
Properly preparing your nails is a fundamental step in achieving a flawless gel manicure. Begin by cleaning your nails thoroughly to remove any oils or residues that may hinder the gel polish from sticking. Next, gently push back your cuticles using a cuticle pusher, then file your nails to your desired shape and buff the natural nail surface to create a smooth base. This careful preparation ensures the gel polish will apply perfectly and cure effectively, setting the stage for a long-lasting finish.
Importance of Cuticle Care
Cuticle care plays a significant role in the gel nail application process, as it affects the overall appearance and longevity of your manicure. By applying cuticle oil or cream before starting your gel application, you can nourish the skin around your nails, promoting healthy growth and preventing hangnails. Removing excess cuticle skin not only enhances the aesthetics of your nails but also allows the gel polish to adhere more effectively to the nail bed, ensuring your gel nails look impeccable and last as long as possible.

Photo by allison christine on Unsplash
Step-by-Step Guide to Applying Gel Polish at Home
Applying gel polish at home can seem daunting, but with the right approach and tools, you can achieve stunning results. This step-by-step guide will walk you through the essential phases of creating beautiful gel nails. From preparing your nails to curing the gel polish, each step is crucial in ensuring that your gel manicure lasts longer and looks perfect, just like a salon finish.
Step 1: Nail Filing and Shaping
The first step in your gel nail application journey is to file and shape your nails. Begin by using a nail file to achieve your desired nail shape—whether it’s square, round, or almond. A well-shaped nail plate provides a solid foundation for the gel polish application. Pay attention to the edges, ensuring they are smooth to prevent snagging. Properly filed nails will enhance the overall appearance of your gel nails at home.
Step 2: Applying Base Coat
After shaping your nails, the next step is to apply a gel base coat. This coat acts as an adhesive layer, helping the gel polish adhere effectively to your natural nail. Use a nail brush to apply a thin layer of the base coat, ensuring you cover the entire nail surface without allowing any polish to touch your skin. This step is crucial for a long-lasting gel manicure, as it prepares your nails to hold the subsequent layers of gel polish.
Step 3: Layering Gel Polish
Layering gel polish is a vital aspect of achieving a flawless gel manicure. Start by applying the first layer of gel polish, ensuring it is applied evenly and thinly across the nail surface. This initial layer sets the stage for the vibrant color to come. After curing the gel polish under UV or LED light, you can proceed to apply additional coats of gel nail polish to build intensity and depth in color, ensuring your manicure looks polished perfectly.
Applying the First Layer of Gel Polish
When applying the first layer of gel polish, it is essential to use a steady hand and apply a thin layer to ensure an even finish. Begin at the cuticle area and gently push the gel polish toward the tips of your nails, avoiding any contact with your skin. This technique helps the gel polish adhere to the nail plate without lifting. Once you have applied the first layer, cure the gel under the light as per the manufacturer’s instructions to set it properly.
How to Apply Additional Layers
Once the first layer of gel polish has been cured, you can apply additional layers to achieve the desired opacity and color vibrancy. Each additional coat should also be applied thinly, ensuring an even distribution across the nail surface. After applying each layer, cure the gel under the lamp for the recommended time. This method ensures that your gel nails last as long as possible, maintaining a durable and glossy finish.
Step 4: Curing the Gel Polish
Curing the gel polish is a critical step in the application process. Each layer of gel must be cured under a UV or LED lamp to harden and adhere properly to your nails. Follow the manufacturer’s instructions regarding curing times, typically ranging from 30 seconds to 2 minutes, depending on the type of lamp and gel used. Proper curing prevents chipping and ensures your gel manicure remains intact for weeks, allowing you to enjoy beautiful gel nails without worry.
Step 5: Finishing with Top Coat
To complete your gel manicure, applying a gel top coat is essential. This final layer seals your manicure, providing a protective barrier that enhances shine and longevity. Use a nail brush to apply the gel top coat evenly over the cured gel color, ensuring complete coverage. Once applied, cure the top coat under the UV or LED lamp. This step not only adds brilliance but also ensures your gel nails look immaculate and last as long as possible.
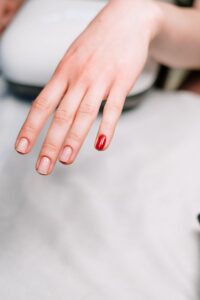
Photo by cottonbro studio on Pexels
Tips for Perfect Gel Nail Application
Avoiding Common Mistakes
When applying gel polish, there are several common mistakes that can hinder the longevity and appearance of your gel nails. One frequent error is applying a thick layer of gel, which can lead to uneven curing and chipping. Always remember to apply a thin layer of gel for optimal results. Additionally, failing to properly clean your nails before application can prevent the gel polish from adhering effectively to the nail plate. Make sure to clean your nails thoroughly and avoid getting any polish on your skin for a flawless finish.
How to Polish Perfectly Without Messing Up
To polish your gel nails perfectly, focus on precision and technique. Start by applying the gel polish carefully, beginning at the cuticle and pushing it toward the tip of your nails. This method ensures that the gel polish adheres well to the nail bed and does not lift. Use a nail brush to control the application and avoid flooding the cuticles. Remember to cure each layer properly under the UV or LED lamp to achieve a long-lasting manicure at home without any mishaps.
Maintaining Your Gel Nails at Home
Once you have successfully applied your gel nails at home, maintaining them is crucial for prolonging their life. Regularly apply cuticle oil to nourish the area around your nails and keep the skin hydrated, which can prevent peeling and enhance the appearance of your manicure. Additionally, avoid using your nails as tools, as this can cause chips or damage. When performing household chores, consider wearing gloves to protect your gel polish and ensure your gel manicure lasts longer.
Removing Gel Nail Polish Safely
Step-by-Step Removal Process
Removing gel nail polish requires a careful approach to avoid damaging your natural nails. Begin by filing the top coat of gel lightly with a nail file to break the seal, which allows the gel polish remover to penetrate effectively. Soak a cotton ball in gel nail polish remover and place it on each nail, securing it with aluminum foil to keep the cotton in place. Allow this to sit for about 10-15 minutes to soften the gel. Afterward, gently push the gel polish off using a wooden stick or cuticle pusher, ensuring you do not force it off to protect your nail plate.
What to Avoid When Removing Gel Polish
When removing gel polish, certain practices should be avoided to prevent damaging your nails. Do not use abrasive tools or excessive force when trying to remove the gel, as this can lead to peeling or tearing of the natural nail surface. Avoid soaking your nails for extended periods in acetone, as this can dry out your cuticles and skin around your nails. Lastly, refrain from picking or peeling off the gel polish, as this can cause significant harm to your nails and lead to long-term damage.
Tips for Healthy Nails After Gel Removal
After successfully removing your gel nail polish, it’s essential to take steps to maintain the health of your natural nails. Start by applying cuticle oil to nourish your nails and the surrounding skin, which helps to promote healthy growth. Consider giving your nails a break from polish for a few days to recover from the gel application. During this time, keep your nails hydrated and avoid exposing them to harsh chemicals. Incorporating a nail strengthener can also aid in rebuilding any strength lost during the gel manicure process.
What is gel polish and how is it different from regular nail polish?
Gel polish is a type of nail polish that is cured under a UV or LED lamp, giving it a durable finish that can last for weeks without chipping. Unlike regular nail polish, which air-dries and may chip easily, gel nail polish requires a specific application process that includes a gel base coat, gel color, and a gel top coat. This curing process helps the gel nails to maintain their shine and strength, making them an excellent choice for a long-lasting gel manicure.
How can I apply gel polish at home?
Applying gel polish at home is a fun and rewarding experience! Start by preparing your natural nail by cleaning it thoroughly and pushing back your cuticles. Then, use a nail file to shape your nail surface. Apply a thin layer of gel base coat and cure it under a UV or LED lamp. Next, apply a thin layer of your desired gel color and cure again. Repeat this step for a second coat if needed, and finish with a gel top coat for a shiny finish. Don’t forget to cure the final coat!
What tools do I need to apply gel nails at home?
To successfully apply gel nails at home, you’ll need a few essential tools. These include a UV or LED lamp for curing the gel polish, a good quality gel base coat and top coat, your chosen gel color, a nail file, a cuticle pusher, and nail polish remover for cleanup. Having these tools ready will make your at-home gel manicure easier and more enjoyable!
How do I prepare my nails for a gel manicure?
Preparation is key to achieving a flawless gel manicure. Start by removing any old polish with nail polish remover. Clean your nails and ensure the nail surface is free from oils or debris. Use a nail file to shape your nails to your desired length and style, whether that’s square, oval, or round. Be gentle while filing to avoid damaging the nail.
Next, push back your cuticles gently using a cuticle pusher or an orangewood stick. This step helps to create a clean canvas for the gel polish and prevents any lifting at the edges. If necessary, you can trim any excess cuticle with cuticle nippers, but be careful not to overdo it.
Afterward, buff the surface of your nails lightly with a buffer block. This helps to create a smooth surface and increases adhesion for the gel polish. Be cautious not to buff too aggressively, as you want to preserve the natural nail structure.
Once your nails are shaped and prepped, wash your hands thoroughly to remove any dust or oils. Dry them completely. Next, apply a pH bond or nail dehydrator to each nail, which helps to eliminate any remaining moisture and ensures better adhesion of the gel polish.
Finally, finish your preparation by applying a base coat specifically designed for gel manicures. This base coat not only protects your nails but also helps the gel color adhere better and last longer. Cure the base coat under a UV or LED lamp according to the product instructions before proceeding with your desired gel color.
With your nails properly prepped, you’re ready to enjoy a beautiful gel manicure that lasts!