How to Shape Natural Nails: Tips for Round, Oval, and Coffin Styles
When you shape natural nails, it can significantly enhance their appearance and complement your personal style. Whether you prefer a classic round shape, an elegant oval design, or the trendy coffin style, understanding the nuances of nail shaping is essential. This article will guide you through the different nail shapes and help you choose the best one for your hands.
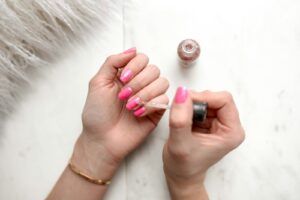
Photo by Element5 Digital on Unsplash
Understanding Nail Shapes
Nail shapes are not merely aesthetic choices; they play a crucial role in how your hands are perceived. The right nail shape can enhance the length and elegance of your fingers, while also reflecting your personality. By understanding the different nail shapes, you can make informed decisions that suit both your style preferences and the practical needs of your lifestyle.
Importance of Nail Shape
The importance of nail shape cannot be overstated. A well-shaped nail can provide a polished look, boosting your confidence and making a statement. Additionally, certain shapes may be more suitable for various occasions, enhancing your overall appearance. Choosing the right nail shape is a vital step in nail care, as it also influences how your nails grow and how resilient they can be to breakage.
Popular Nail Shapes Overview
There are several popular nail shapes to consider, including round, oval, square, and coffin. Each shape has its unique characteristics and appeal. Round nails offer a natural look, while oval nails elongate the fingers. Square nails provide a bold statement, and coffin shapes lend a modern, edgy vibe. Understanding these shapes will help you decide which one complements your style and hand shape best.
Choosing the Right Shape for Your Hands
When choosing the right nail shape for your hands, consider the length and width of your fingers, as well as your everyday activities. For example, if you have shorter fingers, oval or almond shapes can create an illusion of length. Conversely, if you have longer fingers, square or coffin shapes can enhance your elegance. Tailoring your nail shape to your hands can create a harmonious look that accentuates your natural beauty.
Preparing Your Nails for Shaping
Photo by Aleksandra Tanasienko on Unsplash
Before diving into the art of nail shaping, it’s essential to prepare your nails properly. This preparation not only ensures a smoother shaping process but also promotes overall nail health. By gathering the right tools and following essential steps, you can set the foundation for achieving your desired nail shape effectively.
Essential Tools for Nail Shaping
To achieve the perfect nail shape, having the right tools is crucial. Essential items include a quality nail file, nail clippers, a buffer, cuticle remover, and a nail brush. Each tool plays a unique role; for instance, a fine-grit file is ideal for smooth edges, while a buffer helps polish the surface. Investing in these tools will enhance the shaping process and facilitate nail maintenance.
Steps to Prepare Your Nails
Preparing your nails involves several key steps to ensure they are in optimal condition for shaping. Start by trimming your nails to a manageable length, then gently push back your cuticles to create a clean canvas. Follow this by filing your nails in the desired shape, ensuring you file in one direction to prevent splitting. Finally, wash your hands and apply a nourishing cuticle oil for hydration, setting the stage for a successful shaping session.
Maintaining Nail Health Before Shaping
Maintaining nail health is paramount before embarking on any shaping process. Ensure your nails are free from polish and debris for better visibility during shaping. Regularly moisturizing your cuticles and nails contributes to their strength and resilience. Additionally, consider taking biotin supplements to promote overall nail growth, which can enhance the shaping experience and yield better results.

Photo by Raul De Los Santos on Unsplash
Shaping Techniques for Different Styles
Once your nails are prepped and healthy, you can explore various shaping techniques tailored to different styles. Each technique requires a specific approach and understanding of the nail structure to achieve the desired result. Whether you aim for a soft round shape or an edgy coffin style, mastering these techniques will allow you to express your personal style with confidence.
How to Achieve Round Nails
Achieving round nails is a straightforward process that enhances the natural shape of your fingertips. Begin by filing the edges of your nails into a gentle curve, ensuring the sides are slightly tapered. This shape is perfect for those seeking a classic and low-maintenance look, as it complements all hand shapes and is less prone to breakage, making it ideal for everyday wear.
Creating Oval Nails: Step-by-Step Guide
To create oval nails, start by filing the sides of your nails straight down, then round the tip to form an elongated, oval shape. This technique elongates the fingers and offers a sophisticated appearance. It’s essential to maintain symmetry while filing, ensuring both sides mirror each other. Oval nails are versatile and suit various occasions, from casual to formal settings.
Shaping Coffin Nails: Tips and Tricks
Shaping coffin nails requires a more skilled approach due to their distinct tapered edges and flat tips. Begin by filing the sides to create a narrow shape, then file the tip straight across. For a polished finish, buff the edges to remove any sharpness. This style is trendy and can be customized with nail art, making it a popular choice for those looking to make a bold statement.
Finishing Touches for Beautifully Shaped Nails
Nail Buffing and Polishing Techniques
After achieving your desired nail shape, buffing and polishing become essential steps to enhance their appearance. Buffing smooths the nail surface, eliminating any imperfections and adding a natural shine. Use a fine grit buffer to gently polish each nail, ensuring not to overdo it, as excessive buffing can weaken the nails. A good polish applied afterward not only adds luster but also provides a protective layer against daily wear and tear, helping maintain the integrity of your beautifully shaped nails.
Applying Nail Products for Protection
To protect your newly shaped nails, applying suitable nail products is crucial. Start with a base coat before applying any colored polish; this acts as a barrier between your nails and potentially damaging chemicals found in nail polishes. Utilizing top coats can further seal the polish, enhancing durability and shine. Moreover, consider using nail strengthening treatments regularly to fortify your nails, ensuring they remain healthy and resilient against chipping or breaking, thus preserving their shape for a longer period.
Tips for Long-lasting Nail Shapes
To ensure your nail shapes last, incorporate a few simple yet effective tips into your nail care routine. Regular maintenance, including filing and shaping as needed, can prevent breakage and maintain the integrity of your look. Avoid using your nails as tools, which can lead to damage and distortion of your shape. Additionally, moisturizing your cuticles and nails consistently will promote overall nail health, keeping them strong and flexible. By investing time in care, you can enjoy beautifully shaped nails for weeks.

Photo by Andrea Mosti on Pexels
Common Mistakes to Avoid
Over-shaping: Understanding the Risks
One of the most common mistakes in nail shaping is over-shaping, which can lead to weak and fragile nails. When nails are excessively filed or shaped, they lose their natural strength, making them more susceptible to breakage. It’s essential to be mindful of the amount of nail you are removing during shaping. A balanced approach is key; aim for enhancement rather than drastic changes to ensure your nails remain healthy and resilient while maintaining their desired shape.
Neglecting Nail Care After Shaping
Neglecting nail care after shaping can result in unsightly and unhealthy nails. After you’ve achieved your desired shape, it’s vital to continue caring for them through regular moisturizing and avoiding harsh chemicals. Skipping cuticle oil applications can lead to dryness and damage, detracting from your nail’s beautiful appearance. Implementing a post-shaping care routine will help maintain the health and aesthetics of your nails, ensuring they look their best for an extended period.
Ignoring Nail Growth and Maintenance
Ignoring nail growth and maintenance can hinder the longevity of your beautifully shaped nails. As nails grow, the shape may become distorted, necessitating regular upkeep to retain the initial look. Scheduling routine maintenance sessions, where you file and reshape as needed, is essential. Additionally, being aware of your nail growth patterns can help you predict when your nails will require attention, allowing you to stay ahead in maintaining their shape and overall health.
What are the differences between round, oval, and coffin nail shapes?
The differences between round, oval, and coffin nail shapes primarily lie in their structure and visual appeal. Round nails are soft and gentle, featuring a slightly curved top that mimics the natural shape of your fingertips. Oval nails take this a step further by elongating the nail, offering a more elegant and sophisticated look that helps to make fingers appear longer. Lastly, coffin nails, also known as “ballerina” nails, have a distinctive tapered shape that ends in a flat tip, resembling a coffin. This shape is bold and trendy, making it a popular choice for those wanting to make a statement.
How can I shape my natural nails into a round style?
To shape your natural nails into a round style, start by trimming your nails to your desired length. Use a fine-grit nail file to gently round the edges of each nail. Hold the file at a slight angle and file from the outer edge towards the center, creating a smooth curve. Remember to file in one direction to prevent splitting. Once you achieve the round shape, buff the surface lightly for a polished look. Finally, moisturize your hands and cuticles to enhance the overall appearance.
What tools do I need to shape my nails into an oval style?
Shaping your nails into an oval style requires a few essential tools: a good-quality nail clipper, a fine-grit nail file, and a buffer. Start by trimming your nails to a length that suits you; longer nails will provide a more pronounced oval shape. Use the nail file to create the oval shape by filing the sides gently towards the center, ensuring that the tip is rounded rather than pointed. Buff the surface for smoothness. Additionally, using a nourishing cuticle oil will help keep your nails healthy and strong.
Can I achieve coffin nail shape on short natural nails?
Yes, you can achieve a coffin nail shape even on short natural nails! The key is to create the illusion of length. Start by growing your nails out to a manageable length first. Once they’re long enough, use a nail clipper to create a straight edge across the top. Then, file the sides at an angle towards the center, creating a tapered shape. Be patient, as it may take some time to reach the desired length and shape. Regular maintenance and moisturizing will help your nails grow strong and healthy.