5 Festive Holiday Nail Art Designs Every Nail Tech Should Master
The holiday season brings a big rush of clients. They all want pretty nails for parties and photos. Holiday nail art designs are in high demand right now. For nail techs, this is the best time to show off your skills. It is also a great time to build a loyal client base.
Do you dream of working in a salon? Maybe you want to open your own nail studio one day. Either way, learning holiday nail art is key. These five designs will help you wow clients and grow your skills. Each one follows the top trends for 2025. They are also easy enough for students and new nail techs to try.
 Why Holiday Nail Art Skills Matter for Your Career
The beauty world gets very busy during the holidays. Clients want nails that match their outfits. They want to look great in family photos too. This creates big chances for nail techs who know the latest looks.
The Holiday Rush and Client Demand
December is one of the busiest months for nail salons. People book spots for office parties and family events. They get ready for New Year’s Eve too. Many people who rarely get their nails done treat themselves now.
This rush means more work and more money for skilled nail techs. Clients also ask for fancier designs during the holidays. They want something special that stands out from their usual look.
Nail salons often extend their hours in December. Some techs work extra days to meet demand. This busy time can help you build your income fast.
Building Your Portfolio with Seasonal Designs
Holiday nail art gives you great content for social media. Instagram and Pinterest drive much of the nail world today. Posting festive looks brings in new fans and future clients.
A varied portfolio shows what you can do as an artist. Adding seasonal work proves you keep up with trends. Future bosses and clients want to see that you can handle any request that comes your way.
Take photos of your best holiday work. Share them online with hashtags that match the season. This simple step can grow your business in big ways.
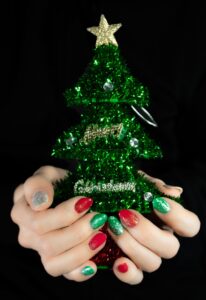
Design 1 – Cat-Eye Christmas Magic
Cat-eye nails are the top nail trend of 2025. They use a magnet to create a glowing stripe. The light catches it in a stunning way. This style works great for holiday nail art designs.
Tools and Products You Need
Cat-eye gel polish has tiny metal bits in it. You need a special magnet wand to make the effect. Most brands sell these tools as kits. They are great for people just starting out.
Pick a dark base color like deep green or dark red. These rich shades feel festive. They also look classy. Put the cat-eye polish on top of the base for the best look.
You can find cat-eye kits at beauty supply stores. Many online shops sell them too. Prices are often quite fair for starter sets.
Step-by-Step Application Tips
Cure your base color all the way before adding the cat-eye layer. Put the cat-eye polish on one nail at a time. Hold the magnet close to the nail for 10 to 15 seconds.
The tiny bits in the polish will move. They create that cool glowing line. Try holding the magnet at different angles. Each angle makes a new pattern.
Cure each nail before moving on. Take your time with this step. Rushing can ruin the effect you worked so hard to create.
Chrome finishes are still huge in the nail world. Chrome mixed with French tips makes lovely holiday nail art designs. Red and gold together feel both classic and fancy.
Achieving the Perfect Chrome Finish
Chrome powder needs a very smooth base. Any bumps will show through the shiny finish. Buff your gel base until it feels like glass under your touch.
Use a soft brush to press chrome powder onto the nail. Work in small areas for even results. Rub the powder in gently until it shines bright.
Practice this skill on nail wheels first. It takes time to get the hang of it. But once you do, clients will love the mirror-like look.
Color Combinations That Wow Clients
Gold chrome tips over a soft pink base look amazing. This combo works for clients who want simple beauty. Red chrome makes a bolder choice for big holiday parties.
You can also flip the French tip around. Put chrome at the base of the nail instead. This fresh twist catches eyes and starts talks.
Try silver chrome for a more icy winter feel. Mix it with white or pale blue bases. The options are endless once you learn the basic method.
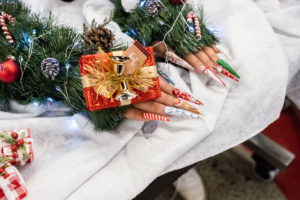
Design 3 – Festive Plaid Accent Nails
Plaid patterns make people think of cozy sweaters. They also bring to mind wrapped gifts. This design trend has blown up this year. Famous people have shown off plaid nails online.
Creating Clean Lines and Patterns
You need thin nail art brushes for plaid designs. Practice on a nail wheel before working on clients. Steady hands come with time and lots of practice.
Start with your base color and let it cure fully. Add up-and-down lines first using a different shade. Then add side-to-side lines to finish the pattern.
Keep your brush loaded with just a little polish. Too much will make thick, messy lines. Thin, crisp lines look much more polished.
Pairing Plaid with Solid Colors
One or two plaid accent nails work better than a full set. Too much plaid can look busy. Pair your plaid nails with matching solid colors for balance.
Deep green plaid looks great with dark red solid nails. Red and black plaid goes well with cream shades. Balance is key in holiday nail art designs that please clients.
Ask your clients what colors they like best. Some prefer bold looks while others want softer tones. Meeting their wishes builds trust and repeat visits.
 Design 4 – 3D Bow and Ribbon Nail Art
Bows stand for gifts and fun times. Three-D bow designs add texture that people love to touch. This method shows off skills that make clients say wow.
Working with Gel for Dimensional Effects
Hard gel lets you sculpt raised shapes. Start with small bows as you learn. Put them on accent nails rather than every finger.
Use a fine brush to shape your bow loops. Keep the size balanced so it looks classy. Cure well between layers so it lasts long.
The bow should not be too thick. A chunky bow can catch on things and break off. Aim for delicate shapes that still pop visually.
Placement Tips for Balanced Designs
Put bows near the base of the nail or along one edge. Center spots can look too heavy on small nails. Think about your client’s nail size and shape first.
Add thin ribbon lines that flow from your bow. Gold or silver accents tie the look together nicely. These small details lift holiday nail art designs to the next level.
Take your time with placement. Step back and look before you cure. A few seconds of checking saves you from having to redo the whole nail.
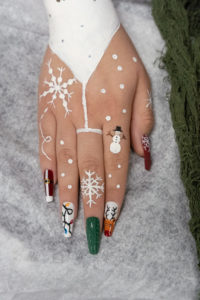
Design 5 – Gingerbread and Candy Cane Whimsy
Fun holiday designs please many clients. Gingerbread men and candy cane stripes bring joy. These looks work best the week right before Christmas Day.
Hand-Painting Techniques for Beginners
Start with easy shapes before adding details. A basic gingerbread man just needs an outline and some dots. Candy cane stripes need straight, even lines.
Use a dotting tool for eyes and buttons. Thin brushes work best for outlines. Practice makes you faster and more steady over time.
Watch online videos of other nail artists at work. Seeing how they hold their brush helps a lot. You can pause and rewind as many times as you need.
Adding Finishing Touches with Glitter
A light dusting of fine glitter looks like powdered sugar. Clear glitter top coat adds sparkle without being too much. Focus glitter on one or two nails only.
Red and white glitter fits candy cane designs. Green glitter works with gingerbread for nice contrast. Seal it all with a shiny top coat to protect your work.
Make sure glitter does not go near the cuticle area. Glitter stuck in skin can be hard to remove. Clients will thank you for being careful.
How Nail Technology Training Prepares You for Holiday Success
Good nail tech classes cover much more than basic nails. Quality programs teach the skills needed for holiday nail art designs. Students learn product use, safety, and how to talk with clients.
Learning Advanced Techniques in School
Nail tech programs teach gel use, acrylic sculpting, and nail art basics. Teachers show you how things are done. They also give you one-on-one help when you need it.
Schools also teach the business side of nail work. Learning how to market yourself matters a lot. Managing your schedule and building client bonds helps too. These skills serve you well during busy holiday seasons.
You get to practice on real products in school. This hands-on time builds your confidence. You learn what works and what does not in a safe space.
Hands-On Practice with Real Clients
Many nail programs let you work on real clients. This happens in school clinics under teacher watch. It builds your speed before you start a real job.
Working with clients teaches you to manage your time. Holiday rushes need you to work fast but still do great work. School gets you ready for these real-life moments.
You also learn how to handle tricky requests. Some clients want things that are hard to do. School teaches you how to say yes or offer other ideas.
 Start Your Nail Tech Journey Today
The need for skilled nail techs keeps growing. Holiday seasons give you strong chances to earn and create. Learning trendy looks like these five holiday nail art designs sets you up for success.
Nail tech training gives you a solid base for a great career. From simple services to fancy art, school opens doors. The skills you learn will serve you for years to come.
Think about looking into nail tech programs near you. Find one that fits your life and your goals. The beauty world welcomes people who love making others feel great.
If you want to learn more, reach out to beauty schools in your area. Ask about how long programs take. Ask about hands-on training and money help options. This holiday season might be the right time to give yourself the gift of a new path in life.